Thursday, February 23, 2012

Grilled Leek

Way back when, when the Mama Bird and I were still getting fresh vegetables from the co-opt every week, we had an influx of leeks. My experience with leeks prior to that was limited entirely to knowing that Farfetch'd carried one in Pokemon. I had never actually seen one before, and I had no idea what they tasted like.

But suddenly, I absolutely had to eat those leeks. I wanted to make a super healthy dinner and I wanted it to involve leeks and I wanted to feel like I was one of those people who tracks their every meal and knows exactly how many carbs they've eaten over the last week, and I wanted to FEEL HEALTHY.

(...on that note, I recommend using LiveStrong if you want to track that kind of stuff. I use it all the time.)

But back to the leeks.

I found a recipe through TasteSpotting and told Mama Bird that I was taking care of dinner that night. And to not touch the leeks. She was amused by my dedication and told me to do whatever I wanted.

This is a super easy recipe. You cut the leeks, cook them with some stock and chickpeas, and then make a lemon-honey-dill dressing and serve it with some feta. Doesn't that sound awesome?


I have no idea why I was so driven to eat those leeks that day, but it was a solid direction. Mama Bird really liked the flavors, but it's definitely not a dish to serve to a meat lover. It would also work really well as a side, since it doesn't serve many. It also sounds really fancy to announce you're serving leeks and feta with a lemon-honey-dill sauce.

On a non-healthy note: Happy Birthday, Mama Bird. I hope you enjoyed that cheesecake, cause it definitely wasn't healthy. <3

Saturday, January 28, 2012

After 10 hours of cooking....


Ridiculously buttery and melt-in-your mouth blackberry muffins....


Fresh paneer....


A spiced applesauce cake....


And a whole mess of peppers, onions, and garlic.

My friends are coming to visit today. We're going to play League of Legends, board games, and feast until we're too full to move. In the interests of that last goal, I've made them a feast. The menu includes:
  • Homemade chips and hummus
  • Minced lamb and peas
  • Palak paneer (although my paneer didn't turn out. So I picked up some peynir instead.)
  • Homemade naan
  • Blackberry muffins (if I'm nice enough to share!)
  • Spiced applesauce cake with cinnamon frosting

    Yeah, I know you wish you were my friend. Birds do like cooking.
  • Wednesday, August 17, 2011

    Jalapeno Cheddar Cornbread.

    I love cornbread. Love, love, love cornbread. I recently went to Boston Market with someone I'll dub Model Bird, and he commented that I must not like cornbread because I didn't touch the piece they gave me.

    "No, I love cornbread," I replied modestly. "I just know that I can make much better cornbread than they can."

    So I did. And if anyone thinks this isn't better than Boston Market cornbread... well, then they certainly aren't any friend of mine.


    My mother was concerned about the jalapeno being in it. I was disappointed to realize that the jalapeno lost its bite once cooked. I should have known that, but I forget things sometimes. It still had a pleasant little kick.


    This is definitely not healthy cornbread. I have a separate recipe I do for that. You could probably half the amount of cheese in the recipe and still be happy with it. But if you're gonna make unhealthy cornbread, you may as well go all the way...

    Recipe from Food Network.
    (Makes 16 squares, with 295 calories and $0.60 per squares.)

  • 3 cups all-purpose flour
  • 1 cup yellow cornmeal
  • 1/4 cup sugar
  • 2 tablespoons baking powder
  • 2 teaspoons kosher salt
  • 2 cups milk
  • 3 eggs
  • 1/2 pound unsalted, melted butter
  • 8 ounces aged extra-sharp Cheddar
  • 1/3 cup chopped scallions (3 scallions)
  • 3 tablespoons fresh jalapeno peppers
    1. Preheat the oven to 350 degrees.
    2. Combine the flour, cornmeal, sugar, baking powder, and salt.
    3. Combine the milk, eggs, and butter in a separate bowl.
    4. Mix wet and dry ingredients carefully, not over-stirring.
    5. Mix in 2 cups of grated cheese, scallions, and jalapenos.
    6. Let sit at room temperature for 20 minutes.
    7. Pour batter into pan and sprinkle with remaining cheddar.
    8. Bake 30 to 35 minutes.
    Today's lessons learned:
    • Jalapenos lose some of their kick when they're cooked.
    • Bread gets moldy if you don't take care of it. It gets moldy faster if it's laced with cheese.
  • Thursday, July 28, 2011

    More meat, more stuffed

    This will be my only post for a while. As you are reading this, I am sitting in a plane, on my way to Madrid. Madrid! I don't speak Spanish at all well enough to be going to Madrid!

    Once again, I'm sure I'm going to take pictures of every meal I eat, even though my faithful camera is now broken. For the time being, I'm borrowing one of Mama Bird's old cameras, but I'll probably have to buy a new one soon. I guess I'd mentioned doing it a few times already, so it's not too big of a deal.


    But before I go, I'll leave you with one of the things I've been meaning to share for a few weeks now. I made these for friends months ago, and it's high time I shared them. I originally thought that they'd be light, that everyone would be able to eat two zucchini boats apiece and it'd be a nice healthy meal. I didn't realize how much meat that would have been for everyone. Next time I make these, I may half the meat, or at least drop it to 3/4 of a pound.

    Recipe from The Homesteading Housewife
    (Makes 8 servings, with 250 calories and $1.94 per serving)
  • 4 zucchini
  • 1 onion
  • 1 green bell pepper
  • 4 cloves garlic
  • 1 pound ground beef (or 1/2 pound ground beef and 1/2 pound Italian sausage)
  • 1/2 teaspoon oregano
  • 2 eggs
  • 1/2 cup parmesan cheese
  • 1/2 cup bread crumbs
  • 2 cups mozzarella cheese
    1. Preheat oven to 375.
    2. Wash zucchini, but do not chop stems.
    3. Put in a pot of cold water, and bring to a boil.
    4. Let boil 6-7 minutes or until tender, and remove and set aside to cool.
    5. In a skillet, brown meat and add garlic, onion, oregano, and peppers.
    6. Slice zucchini lengthwise, and scoop out seeds.
    7. Chop extra zucchini 'meat' and add to meat mixture.
    8. Mix bread crumbs, Parmesan, and eggs in with meat, and mix well.
    9. Fill zucchini boats with meat, and top with mozzarella.
    10. Bake until cheese is hot and bubbly.
    Today's lessons learned:
    • Stuffed anything is much more filling than you think.
    • Sometimes, more meat is not the answer. But only sometimes.
  • Friday, May 27, 2011

    Caramelized Onion Sandwich

    The vegetarian adventure is going well. My grandparents are visiting right now, and my grandfather enjoyed eating his Denver steak- not the cut, but a recipe I will share here someday- as slowly as possible, and discussing how delicious it was with a big grin. They're here for a week, and I'm thinking it's going to be a very difficult week. But it's nice to see them.

    The decision to make this came from my looking at the archives and realizing I had not made anything off my list of things I had eaten in England, other than that coconut ice I tried to recreate.

    Y'know, that's probably vegetarian too. Maybe I ought to make that this week.

    Anyhow, I realized that re-creating that list was a goal I had set myself that I had made no progress on. Granted, it's not exactly a pressing goal, but... I said I would do it, darn it, and I was going to do it. So the first meatless dish I came to was the onion sandwich, and I cringed slightly.

    I remember how proud of myself I was when I ordered that. A sandwich with no meat? Just vegetables? Well, darned if I wasn't the most cultured American in all of London. Who cares if it came with fries? I was still cultured and proud of it. The smug pride lasted until I took the first bite, and realized it was sweet and served cold.

    It wasn't bad, mind. I ate most of it, as you can tell by the quarter that was left by the time I remembered to take a picture. But it wasn't something I would ever order again. So why would I want to cook one for myself?


    Because I made mine savory. Worcestershire sauce (also, how English!) instead of sugar, and on toasted bread with melted cheese. And a bit of mustard, because it sounded good. Instead of the fries, I served it with enough broccoli on the side that my sister asked if it was the serving plate for everyone else. She was disappointed. My family was amused by my sandwich, but I enjoyed it.

    It could have been less calories if I had used lighter bread, but I decided I wanted something firm to stand up to the cheese, and because I thought at first the onions would be very oily. They weren't, but the bread was still delicious.

    Hopefully I'll be making more England food after this month is over. But so far, I'm really enjoying the lack of meat. Hopefully Darth Bird is holding up!

    Recipe from Closet Cooking.
    (Makes 1 sandwich, with 500 calories and $2.38)
  • Half a large onion
  • 1 tablespoon oil
  • 2 tablespoons water
  • 1 teaspoon Worcestershire sauce
  • 1/2 teaspoon thyme
  • 2 slices cheddar cheese
  • 2 slices oatmeal bread
    1. Slice the onion thinly.
    2. Heat up oil, then saute onions until no longer firm.
    3. Reduce heat, add water, and stir occasionally for 15-20 minutes.
    4. Toast bread.
    5. Add Worcestershire and thyme to onions, and scoop on top of bread and cheese.

    Today's lessons learned:
    • I have come to really like onions, but perhaps not enough for daily onion sandwiches.
    • Savory onions are much more delicious than sweet onions.
  • Friday, May 20, 2011

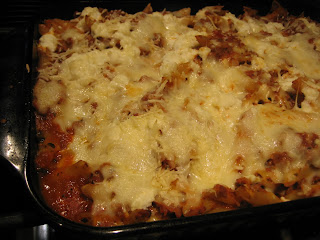
    Mother's Day Baked Ziti

    The blog layout finally changed! It's got 99% less birds, 100% less stripes, and 100% more food. Looking at that picture does make me wish I had more of those tacos, though... I'll add them back onto the list of recipes I need to make. First on the list is everything I ate in England. I swear I'll get to that before it's been a full year.

    I wasn't sure what I should have shared today. As the first day of my meatless month thought it'd be fitting to share something vegetarian, but I don't have anything vegetarian I've been waiting to share. I was tempted to post the last muffin recipe I have stored just to make it three muffins in a row, but I decided a real meal every now and then is a good idea too.

    Not that I couldn't live off muffins. You can put fruits and veggies in those, so don't let anyone tell you a muffin isn't a complete meal.

    Mother's day was almost two weeks ago, which is years in blog time. But I never shared when we cooked up for Mama Bird, and that's really a shame, because it was a very filling meal that lasted us for quite a few days.

    Yes, I said what 'we' cooked up. Sister Bird and I told Mama Bird that we would take care of dinner for her on Mother's day. I originally was hoping to make her stuffed zucchini, but Sister Bird isn't quite on-board with my desire to be trying new food, so she vetoed it as soon as it was suggested. But since Mama Bird been's bragging to her about what a good cook I am now, she still wanted me to come up with something for us to make.

    One thing I've learned about my sister over the years is that she loves meaty, cheesey pasta dishes. So I told her we should make ziti. She vetoed the meatless version, too. It was not a terribly healthy dinner, but you can't win them all.

    We also decided to make garlic bread. If I had thought about it more, I would have prepared it differently, but I am rarely known for thinking ahead.


    So I just melted some butter, minced some garlic, and stirred them together for a little, then put them on the bread. It was super garlic-y.


    Luckily everyone in my life loves garlic. A lot.

    So, if I had thought ahead for the garlic bread, I would not have melted the butter, but just left it soften. Then I could have stirred the minced garlic into it, spread it on the bread, and then broiled it. That would have made sense, instead of spooning melted butter and slightly cooked garlic onto pieces of bread.


    The baked ziti was HUGE. I don't mean 'oh, it fed our family and we had leftovers the next day' huge. I mean it fed all four of us, Sister Bird took another fourth of it to school with her, and Mama Bird and I ate it for lunch for another four days. It was so bulky that when I put it in the oven it scraped up against the top. There's still melted cheese in the oven now, and you smell it whenever you use the oven.

    It's been annoying Mama Bird quite a bit. Happy Mother's Day?


    These pictures were extremely rushed, because we were all quite hungry by the time it came out of the oven. Well, I saw all of us, but maybe it was just me. It's so hard to tell sometimes.

    Overall, it was a little sweet for me. I don't care for sweetness in most main dishes, and although I think my family agreed it was slightly sweet, no one else had that problem. Don't get me wrong: this was still a meaty, cheesy, pile of delicious pasta. I would have just upped the red pepper flakes and most likely included Sriracha if I had been making it for myself and friends instead of Mama Bird. I also think this was really closer to 16 servings than 12, but we had eaten signifcant salads and a fair bit of super garlic-y bread before we really got into it.

    Recipe from Simply Recipes.
    (Makes 12 6 ounce servings, with 441 calories and $2.37 per serving)

  • 1 pound ziti pasta
  • 1 pound ground beef, pork, sausage, or a mix
  • 1 onion
  • 3-4 garlic cloves
  • 3/4 tablespoon basil
  • 1 tablespoon thyme
  • 1 tablespoon rosemary
  • 1/2 tablespoon red pepper flakes
  • 32 ounces marinara sauce
  • 1/2 pound mozzarella cheese
  • 1 cup ricotta
  • 1 cup parmesan
    1. Preheat oven to 350.
    2. Bring a pot of water to boil, and cook pasta.
    3. Brown the meat, adding onion and garlic whenever desired.
    4. Add herbs once meat has been browned, and stir well.
    5. Cook about a minute, then add tomato sauce and bring to a simmer.
    6. Spread a thin layer of sauce in the bottom of casserole pan.
    7. Spread half of the ricotta over the sauce.
    8. Mix some of the sauce with the pasta, and then add to pan.
    9. Spoon the remaining sauce over the pasta, and layer with cheese.
    10. Bake in the oven until top is browned, about 20 minutes.

    Today's lessons learned:
    • When putting stuff in the oven, make sure there's enough room for it. If not, move the racks down.
    • Don't get cheese inside the oven, it will smell like burning for weeks.
  • Friday, April 29, 2011

    Sick birds don't cook

    A lot has been happening, but not in my kitchen. I've been sick and incredibly grumpy because of it. Grumpy birds are dangerous. I've been downing cough drops, tea, and every cold medication I can find, but nothing seems to be helping. I just hope I'm not contagious, or my office is going to be very angry at me.

    The week hasn't been a total loss: I beat Portal 2. Yes, this is a cooking blog, and I probably shouldn't dedicate an entire post to video games. But I don't think you really want me to detail how I ate nothing rice and beans this week, either.

    Ye gods, that game was absolutely everything I could have hoped it would be. GLaDOS was perfect and witty all over again, it was a full-length game, there were more than two characters, and my Cube, my beautiful angel returned, and... oh, too many amazing things. It's inspired me to go play through the Half-Life series. I've started Half-Life: Source twice now, but never gotten past the 'Blast Pit' chapter. Hopefully this time I'll pull through. I'm also probably going to do something crafty in honor of the Companion Cube, but don't expect that for a few months. I'm rather slow.

    I'm also extremely tempted to make Portal cupcakes, but my ideas aren't terribly creative right now. I'm also only 12 pounds away from my weight-loss goal, so cupcakes aren't exactly the best idea right now. Maybe if I made whole-wheat cupcakes. Although I think muffins are much better suited to being whole wheat, don't you?

    I think that whole-wheat bread tastes much better than white. Many of my friends agree with me, but I know at least one who thinks whole-wheat is disgusting. For a while I thought he was absolutely insane, but then I remembered bananas nauseate me, and I can't stand the taste of egg. We've all got our food quirks, and I didn't really think the 'whole-wheat versus white' would ever be a problem. And it hasn't been. Until I decided to make calzones for our weekly get together, and I showed up with four pounds of whole-wheat dough.

    I mentioned a few posts ago that I had bought a copy of Artisan Bread in Five Minutes a Day, and I bet you thought I hadn't used it yet. I've only used it once so far since our house is usually swimming in carbs, but I can't wait until I have an opportunity to make it again.

    I am curious/nervous about using generic flour instead of King Arthur for making dough, though. I'll have to experiment on it and see how much of a difference in taste it makes.


    This time I used 90% King Arthur flour. I had to top off the last cup of unbleached flour with some generic stuff, and this turned out fine.

    I've read on a few blogs now that measuring out and preparing all of your ingredients before starting to actually cook is a big time-saver, and a much better way to cook. I'm trying to get in that habit, so we'll see if it really helps me. We'll see if I remember to do it more than once.


    I hadn't really messed with yeast before arbitrarily deciding to make four pounds of dough. Except that time I made naan. I'm still trying to gain confidence in working with yeast, so... I took a picture at what the yeast mixture looked like at this point so I would know what to look for in the future. I swear I'm not crazy, just planning for the future.

    Do crazy people say that? I hope not.


    One thing I've learned in my short bread-making experience is that dough is always stickier than I expect it to be. Without fail, it will stick to my hands in new and creative ways, and I will be stuck with half of the dough on my fingers. I keep saying I've learned my lesson and that I'll use more flour in the future, but... it hasn't happened yet.

    I made this dough on a Sunday night, for dinner on Tuesday. I kept it covered in the fridge, and it was very hard for me to not check on it every hour on Monday, but I managed somehow. Not that peeling the top back would have hurt it, probably. Bread is still a mystery.


    For some reason, I've been on a vegetarian streak this week. I haven't had any meat since Sunday, when we had Easter ham. The truth is that I haven't wanted to cook because I don't want to spread my plague, and since I dislike cooking for just myself I've been eating incredibly simple dishes, à la rice and beans. But I promised to not bore you with those details.

    In all seriousness, I've been eating more meatless meals because I know how many calories meat can bring to the table, and I've realized it doesn't have to be the focus of every meal. There was plenty of chicken available for the calzones, and I opted to not use any. Just sriracha, spinach, onions, and cheese. And I didn't miss the meat at all.

    Mind you, I still could happily eat nothing but meat for an entire day. I've just learned that meat isn't the end-all be-all of culinary experiences.


    Remember to poke holes in your calzones if you don't want them to explode. Because they can, and they will. These were incredibly simple to make, and were pretty fun to do with a group of friends. I'm curious if they'd freeze well. I really hope so, because I've been crazing a buffalo chicken calzone and if that turns out well, I see many in my future...

    Today's lessons learned:
    • Dough is sticky. Use a lot of flour on your hands.

    Tuesday, April 19, 2011

    What's a gnudi?

    Almost a month ago, I came across an interesting recipe for something called gnudi. At first I thought 'oh, I wonder if this is just some variation of gnocchi...' But all my internet sleuthing turned up very little. Searching now, there are many more pages for gnudi than there used to be.

    I had... approximately zero experience making anything like this. But wasn't that the point of making this blog? To give me experience trying things. So I decided that the worst thing that could happen would be I'd end up with little dough balls that weren't delicious, and I'd have to throw them out. So I set about assembling the ingredients.

    And then realized that the Harris Teeter and the Giant near me don't carry semolina flour. So I just sort of gave up on finding it, and complained to Boyfriend Bird a few times about it, until he learned that his father had semolina flour, which I happily 'borrowed.' It still took me a few days to get around to actually making them, but I was extremely nervous from reading the directions. They didn't look that complicated. Just make little cheesy balls, sit them in flour, and then boil. Pfft, if that was all pasta-making was, I could be running my own pasta shop.


    It seemed so flawless at first. It smelled beautiful, and it was SO MUCH cheese. I sort of wondered about how much cheese it was as I was doing it, but I didn't worry about it. I probably should have. I also probably should have not used Kraft grated Parmesan. I will regret that for some time.


    The directions said that as you combine everything, it should become light and airy. No. No it did not. I tried to whisk it for at least twenty minutes, but it just stayed... solid. I was quite concerned at this point, but figured 'well, I'll just see what happens.' I don't know WHY I didn't think to just put this on the electric mixer and let it work its magic, but apparently it didn't occur to me. So I carried on with my experiment.


    The next part was easy. Stack cheese balls in flour, and let it sit in the fridge? Okay, I can do that.


    It made so many more than I expected... it completely filled the biggest Tupperware container we had.

    On that note, I absolutely love those things. That may sound odd, but in our house it's been nearly impossible to find matching containers and lids. Mama Bird recently bought a bunch of new containers. So now I don't have to spend half an hour trying to pack up food whenever I want to put it away. I need to start putting date labels on things, but I never remember that until I'm staring at the container four weeks later and wondering what the chances of the food still being good is.


    This may be one of the few pictures I have shown on this blog I actually like. Because I took the extra five minutes to go outside, judge the light a little, and take a 'nice' picture. It's still not perfect- I know now that if I had a lamp, I could have gotten rid of that huge shadow. And maybe I could have found some construction paper to hide the road in the background. But y'know... at least I'm aware of my shortcomings.

    Anyway, how did they actually taste? The site described them as little explosions of ricotta and Parmesan covered in a gentle pasta shell. To me, they tasted just like Parmesan. That was it. I could only eat two and I felt sort of ill from the amount of cheese. A complete failure, honestly. Jujyfruits Bird tried them, and he was polite about it but I think he hated them too. They sat in the fridge, with me trying them once or twice more and disliking them every time, until I just threw them away in frustration.

    Not everything I cook can turn out well. I'm just glad these weren't really for anything.

    Gnudi from The Paupered Chef
  • 1 cup fresh ricotta cheese
  • 1 cup grated Parmesan
  • 2 eggs plus 1 egg yolk
  • 1 teaspoon grated nutmeg
  • 2 tablespoons minced fresh chives
  • 1/2 cup all purpose flour
  • 4 cups semolina flour
  • 3 tablespoons unsalted butter
  • 10-12 sage leaves

    1. Combine ricotta, Parmesan, eggs and yolk, nutmeg, and chives in a bowl and combine. It should be light and airy when you're finished.
    2. Fold in the flour until it's combined, until it's firm until to roll into balls.
    3. Roll the ricotta mixture into balls and place in a dish with semolina on the bottom.
    4. Arrange the balls so they aren't touching, and cover with more flour when there is no more room.
    5. Put in the fridge and leave overnight.
    6. Allow gnudi to come to room temperature and boil a pot of water.
    7. Melt butter over medium-high meat, and when it begins to brown, add sage leaves, and then remove from heat.
    8. Put gnudi in boiling water and cook until they float.
    Today's lessons learned:
    • Cheese is strong.
  • Monday, April 4, 2011

    Spinach and Cheese Lasagna Rolls

    Lasagna rolls have been on my list of things I've wanted to make for a very long time. I bought the lasagna noodles a long time ago, and then once they were out of sight, they were certainly out of mind. Yes, if I had a witty bird-brain joke, it'd certainly go right here.

    I surprised Mama Bird when I told her these were vegetarian. She informed me that Papa Bird would be very disappointed, as he gets a lot of his meals from raiding our leftovers. Apparently Papa Bird doesn't like cooked spinach. He also doesn't like curry powder. I'd call him crazy, but Boyfriend Bird dislikes it as well.

    (Actually, I think they're both crazy.)

    But back to the lasagna rolls. I did not get many good pictures, partially because my camera's battery was dying, partially because I was hungry and rushing, and partially because I forgot. Take your pick.

    These come together very easily, though. It's as simple as making the noodles, mixing everything up, rolling them, and popping them in the oven. The original recipe calls for breading the rolls before baking them, but Mama Bird and I opted to just put sauce on them and bake that way. I think I would have enjoyed the crunch that the breadcrumbs would have given them, but they certainly weren't lacking in taste.

    The only other alteration to this recipe is that I have no idea how much mozzarella we used. Mama Bird had bought a block of mozzarella, and when I told her the recipe needed some she just grated up the rest of it. I saw it in the bowl five minutes later and just assumed she had measured it because the recipe was sitting right next to said bowl. So I just mixed everything else up in the bowl, and it wasn't until the rolls were going in the oven that she asked what I did with the rest of the cheese.

    Ignore the 'lack' of meat in this recipe, with this much delicious cheese, you won't miss a thing.


    You cut the lasagna rolls in half, so you don't just taste pasta. I only boiled 10 pieces of lasagna at first, and ate one. Our pan wasn't entirely full, but we had to make more anyway because I apparently understuffed the rolls. I think they were fine that way, but maybe you want even more cheese in every bite.


    Here is another plate that, if only I had plated it well, could have looked amazing. But I was hungry, it smelled good, and Mama Bird was already eating. Waiting was not an option.

    Spinach and Cheese Lasagna Rolls from My Kitchen Addiction
    (Makes 25 rolls, about $1.48 and 414 calories per 5 rolls)
  • 12 lasagna noodles
  • 5 ounces fresh spinach
  • 1/2 cup ricotta cheese
  • 1/2 cup cottage cheese
  • 4 ounces mozzarella cheese
  • 1 ounce Parmesan cheese
  • 1.25 cups marinara sauce

    1. Preheat oven to 425.
    2. Boil lasagna noodles according to directions. Drain and set aside.
    3. Cook spinach, drain and shred.
    4. Combine spinach, ricotta, cottage cheese, mozzarella, Parmesan, and salt and pepper.
    5. Cut lasagna noodles in half and put about a spoonful of cheese mixture in each half.
    6. Place seam-side down in PAM'd tray.
    7. Pour marinara over top and bake for 20 minutes.
    Today's lessons learned:
    • Make sure Mama Bird has measured the mozzarella before you just use it blindly.
  • Monday, March 7, 2011

    Sun-dried Tomato Pesto Pizza- cause birds don't like tomatoes.

    Mardi Gras completely snuck up on me. I've always wanted to make a King Cake, but this year will not be that year. Oh well.

    I made a pizza last week. Someone told me it didn't qualify as a pizza because it didn't have tomato sauce. This spawned a debate over whether or not white pizzas are actually pizza, which I think is totally ridiculous. What is the 'technical' definition of pizza? A lot of things can be considered pizza. Where do you draw the line?

    But, regardless of what my so-called friend says, this is definitely a pizza. And a delicious one at that. It actually motivates me to want to make it a third time-because I made it twice in one week!- with completely homemade dough, to see how much better it gets.


    But this time, I made it with store-bought dough. I bought whole-wheat from Harris Teeter, and it was quite good. I have already found a recipe for a knock-off, so I hope to recreate it at some point. I should probably wait a few weeks, though. The second time I made this, I had to use a pre-baked pizza round, because there was no dough and I didn't have time to make my own. That pizza didn't turn out nearly as well, but it wasn't the fault of the pizza crust.

    ...not entirely, anyway. I have learned a lot about what a difference fresh ingredients can make in a dish.


    Mama Bird is so much better at chopping onions than I am. She was not amused I was taking pictures instead of making the dinner I had promised her and Papa Bird. She also chopped the jalapeño for me, because I am so bad at knives.


    The 'sauce,' and what apparently disqualifies this from being a pizza, was delicious. It was a combination of sun-dried tomato pesto, basil, oregano, butter, olive oil, and garlic. Now, I am generally a big believer of 'there is no such thing as too much garlic,' but this recipe called for three tablespoons of garlic. Some googling is telling me that this should be about 5 or 6 cloves, but when I was mincing my garlic, 4 cloves was one tablespoon, and they weren't small cloves. So I added 6 or 7 and stopped. The garlic flavor was right about where I like it, although I am now curious what it would have tasted like if I had added all of the garlic.


    Next time I am definitely adding more onion. I was afraid to put too much on, forgetting it was a sweet onion. Next time, I won't hold back.


    I also used baby spinach because... well, honestly, I love baby spinach. I would eat it in just about anything.


    The jalapeño chunks were too small to really be seen here, but the feta on top of it was amazing. I haven't had a ton of experience with feta, so I wasn't really sure what it would taste like. I tried a few stray pieces, but couldn't decide how I thought it'd interact with all of the ingredients. So I slid it into the oven, and waited.

    And waited.

    And waited.

    The pizza dough took nearly half an hour to bake. If Mama Bird hadn't been in the kitchen guarding the oven, I would have probably eaten it half raw, because it smelled wonderful.


    But it was definitely worth the wait. This pizza turned out perfectly. I omitted the sliced tomato from the cast of ingredients, because I honestly don't like tomatoes. Yes, I eat ketchup, and I am fine with tomato sauce on pizza and pasta, but I like to go light on them. And I don't care for the texture of tomato. Birds don't eat tomato. The jalapeño also had no kick, probably because we destroyed the seeds.

    The second version of this pizza I made didn't turn out nearly as delicious, which disappointed me since my friends were excited for it given the description. The pre-made crust wasn't nearly as good, which was disappointing. But it was also a normal 8 inch pizza crust, as opposed to the vaguely-rectangular blob I served. It was the same amount of feta in a smaller area, and I think it was too much feta. I found it overpowering, and I don't think the guys were terribly impressed.

    They don't know what pure deliciousness they missed. But you can.

    Sun-dried Tomato Pesto Pizza from Reddit
    (Serves 3, approximately $5.60 per serving)
    Ingredients
  • 2 tablespoons butter, melted
  • 1 tablespoon olive oil
  • 5-7 minced garlic cloves
  • 2 tablespoons sun-dried tomato pesto
  • 1 teaspoon dried basil leaves
  • 1 teaspoon dried oregano
  • 1 tablespoon grated Parmesan cheese
  • 1 unbaked pizza crust
  • 1 bunch fresh spinach, torn
  • 1 sweet onion, sliced
  • 1 fresh jalapeno pepper, chopped
  • 6 oz feta cheese, crumbled

    Directions
  • Preheat oven according to dough directions.
  • In small bowl combine butter, olive oil, garlic, pesto, basil, oregano, and Parmesan.
  • Spread evenly on pizza crust.
  • Arrange spinach, onion, tomato, and jalapeno on pizza. Top with crumbled feta.
  • Bake according to package directions.

    Today's lessons learned:
    • Fresh ingredients are important
    • Feta is strong

    Tonight I am making baked wonton crackers and two flavors of hummus: lemon and spicy. I'll be serving them as appetizers at a mini-dinner party on Wednesday. We'll see how it all turns out.
  • Thursday, December 9, 2010

    Spinach Stuffed Chicken

    Last week, I went above and beyond the call of duty and planned a whole week of menus for my family, which was mostly just Mama Bird and I. I also went above and beyond the Call of Duty to fight Nazi Zombies, but that's hardly related. (We only survived to round twelve. I am not very good at fighting Nazi Zombies, apparently.)

    One of the things I had planned on making last week was Broccoli Stuffed Chicken, not that I had any particular recipe picked out for it. It just sounded cool, and I wanted to try it. But Mama Bird pointed out we didn't have broccoli, just spinach, and both of us were too lazy to go to Giant to buy any. So we decided to make spinach stuffed chicken. It's got more alliteration to it, anyhow. And because I am brave and bold, I opted to not use a recipe. (Mama Bird advised me a lot. A lot.)

    And it turned out pretty good! You can't tell from these pictures, as I'm a terrible photographer, but... use your imagination. They honestly weren't complicated: pound some chicken breasts so they're sort of flat, put cheese on them, and then put spinach on the cheese. Fold it, toothpick it, put bread crumbs on them if you do desire, and put em in the oven until they're done! Then eat. I'd advise you let them cool, but hey, what do I know.

    I put pepper jack in mine, and Mama Bird got swiss, since she tells me I make things too spicy sometimes. I thought it was awesome with pepper jack, it gave it a little kick that it totally needed.

    A not so artsy picture of them coming out of the oven. Notice the pool of melted cheese, breadcrumbs, and chicken juice in the middle. Poor planning on my part.


    And this highlights the other problem I had with it: the folded end was just entirely chicken, no spinach. So I think next time I might mess around with cutting the chicken and trying to make a chicken sandwich. Yes, I know, not quite the idea, but it'd be interesting, wouldn't it? We'll see what happens.


    Spinach Stuffed Chicken from the Bird
    (Serves 2, approximately $4.93 per serving)
    Ingredients
  • 2 chicken breasts
  • 3 ounces baby spinach
  • 1 teaspoon Italian seasoning
  • 1 teaspoon onion flakes
  • 2 slices Pepperjack, or desired cheese
  • 1/2 cup Italian seasoned bread crumbs

    Directions
    1. Boil or steam spinach.
    2. While spinach is cooking, flatten chicken breasts as much as possible.
    3. Place a piece of cheese on each breast.
    4. Remove spinach from pot or steamer, and mix with Italian seasoning and onion flakes.
    5. Spoon spinach onto cheese, and fold chicken breast over.
    6. Secure with toothpick.
    7. Sprinkle breadcrumbs over top.
    8. Bake at 350 for 25 minutes, or until done.

    Today's lessons learned:
    • 'Flatten chicken' does not mean do it until you're bored, it means flatten the chicken.